Developing Web
Applications
with OpenRules and Tomcat
Part 2 – Implementing "HelloCustomer" Application using JSP and Java
This is the second part of a step-by-step account of how
to develop web applications using
Tomcat and OpenRules.
The first part described how to setup a Tomcat-based development environment and
create a trivial web application. In this part we will add JSP-based GUI and
Java classes to implement a HelloCustomer application that will greet a customer based on his/her personal data and time
of the day. For example, at 2:20PM for a customer "Robinson" who is a married
woman of 28, we want our server to generate a greeting like "Good Afternoon,
Mrs. Robinson!". At the same time, we want to implement this application in such
a way that it can be easily extended to cover a much more complicated business
logic with multiple business objects. So, we will define a business object GreetingEngine that can be considered as a greeting generation service.
Step 5 – Defining Business Object Model
Our HelloCustomer application will deal with an object Customer, for which we should be able to specify name, gender, marital status, age, and probably other characteristics. Let's create a Java package "hello", in which we will put a new Java class Customer and all other classes that will describe a business object model of our application. Create a directory 'hello' under the src directory, and put into it the following Java class:
| hello.tomcat/src/hello/Customer.java |
package hello;

public class Customer
{
	protected String name;
	protected String maritalStatus;
	protected String gender;
	protected int age;

	public Customer() {
		name = "Robinson";
		maritalStatus = "Married";
		gender = "Female";
		age = 25;
	}

	public String getGender() {
		return gender;
	}
	public String getMaritalStatus() {
		return maritalStatus;
	}
	public String getName() {
		return name;
	}
	public void setGender(String string) {
		gender = string;
	}
	public void setMaritalStatus(String string) {
		maritalStatus = string;
	}
	public void setName(String string) {
		name = string;
	}

	public int getAge() {
		return age;
	}
	public void setAge(int age) {
		this.age = age;
	}
}
|
As you can see, this is a simple Java bean that consists of getters and setters for all Customer's attributes. But it will allow us to create a customer and set/get its attributes when we need to do it. Now we will define an object GreetingEngine that should implement an interface to our web-based greeting service. The main function of this service is to generate a personalized greeting for any Customer based on time of the day and customer's attributes. Let's add the proper interface to our hello package:
| hello.tomcat/src/hello/IGreetingEngine.java |
package hello;

public interface IGreetingEngine {

	public String generateGreeting(Customer customer);
}
|
We can have different implementations of this interface including Java, XML, or rules. These two classes present our simple business model.
Step 6 – Implementing Business Logic in Java
While we can have different implementations of
GreetingEngine interface, now we will proceed with a basic Java implementation.
However, even using Java, it makes sense to encapsulate business logic of
greeting generation in a separate underlying "engine" that will be called by our
GreetingEngine. Let's postpone an implementation of the proper Java class
JavaEngine for a while, and try to implement our GreetingEngine first. Here is a
possible implementation:
| hello.tomcat/src/hello/GreetingEngine.java |
package hello;

public class GreetingEngine implements IGreetingEngine {

	private JavaEngine engine;

	public GreetingEngine() {
		engine = new JavaEngine();
	}

	public String generateGreeting(Customer customer) {
		EngineResponse response = new EngineResponse();

		engine.run(customer, response);

		String result = response.get("greeting") + ", " +
				response.get("salutation") + " " +
				customer.getName() + "!";
		System.out.println("Generated Greeting: " + result);
		return result;
	}
	public static void main(String[] args) {
		GreetingEngine engine = new GreetingEngine();

		Customer customer = new Customer();
		customer.setName("Robinson");
		customer.setGender("Female");
		customer.setMaritalStatus("Married");

		engine.generateGreeting(customer);
	}
}
|
In this implementation, we create an instance of JavaEngine inside the constructor for GreetingEngine. We run this engine inside method 'generateGreeting' by passing to it two parameters:
customer - to analyze customer's attributes
response - an object of a new class EngineResponse, into which JavaEngine is supposed to place generated greeting (like "Good Morning") and salutation (like "Mrs.").
So, we will also need a simple class EngineResponse
that can be just an extension of standard HashMap:
| hello.tomcat/src/hello/EngineResponse.java |
package hello; import java.util.HashMap;
public class EngineResponse extends HashMap {
}
|
And finally, we are ready to concentrate on a
JavaEngine implementation. By now we already know that this Java class should
have a method 'run' with two parameters of types Customer and EngineResponse. We
also can create two separate methods to define Greeting and Salutation. Here is
a possible implementation:
| hello.tomcat/src/hello/JavaEngine.java |
package hello;

import java.util.Calendar;

public class JavaEngine {

	public void run(Customer customer, EngineResponse response) {
		defineGreeting(customer,response);
		defineSalutation(customer,response);
	}

	public void defineGreeting(Customer customer, EngineResponse response) {
		int hour = Calendar.getInstance().get(Calendar.HOUR_OF_DAY);

		String greeting = "?";
		if (hour > 0 && hour <= 12)
			greeting = "Good Morning";
		else
		if (hour > 12 && hour <= 18)
			greeting = "Good Afternoon";
		else
		if (hour > 18 && hour <= 21)
			greeting = "Good Evening";
		else
		if (hour > 21 && hour <= 24)
			greeting = "Good Night";
		response.put("greeting",greeting);
	}

	public void defineSalutation(Customer customer, EngineResponse response) {
		String salutation;
		if (customer.getGender().equals("Male"))
		{
			if (customer.getAge() < 4)
				salutation = "Little";
			else
				salutation = "Mr.";
		}
		else
		{
			if (customer.getMaritalStatus().equals("Married"))
				salutation = "Mrs.";
			else
				salutation = "Ms.";
		}
		response.put("salutation",salutation);
	}
}
|
While this implementation is not end-user friendly and difficult to extend, it should serve our purposes. You may already test it by running GreetingEngine as a regular Java application. Later on we will try to replace it with business rules.
Step 7 - Adding Presentation Logic in JSP
Now we will convert out trivial JSP page
'index.jsp' in the war directory into a meaningful graphical interface for
HelloCustomer application. We want to create a web page that will allow a user
to enter customer's name, gender, age, and marital status and push a button
"Generate Greeting". This button should pass customer information to a web
server, that will run our GreetingEngine and will return back another web page
with a generated greeting. We will use the standard JavaServer Pages (JSP)
technology to define this dynamic web page inside our 'index.jsp' file. We will
use already defined Java classes Customer and GreetingEngine and standard JSP
tags. Here is a new index.jsp:
| hello.tomcat/war/index.jsp |
<%@ page import = "hello.Customer" %>

<jsp:useBean id="customer" class="hello.Customer" scope="session"/>
<jsp:setProperty name="customer" property="*"/>

<jsp:useBean id="engine" class="hello.GreetingEngine" scope="session"/>

<html>
  <head><title>HelloCustomer</title></head>
  <body bgcolor="lightblue">
  <font size=4>

  <form method=post>	<hr><br>
	Customer Name: <input type=text name=name value=<%= customer.getName() %>> <p>
    	Customer Gender:
  	<input value="Female" type="radio" name=gender
	<% if (customer.getGender().equals("Female")) {%> checked="true" <%}%>
		/>Female
	<input value="Male" type="radio" name=gender
	<% if (customer.getGender().equals("Male")) {%> checked="true" <%}%>
		/>Male
	<p>
	Customer Age: <input type=int name=age value=<%= customer.getAge() %> > <p>

	Customer Marital Status:
	<input value="Single" type="radio" name=maritalStatus
	<% if (customer.getMaritalStatus().equals("Single")) {%> checked="true" <%}%>
		/>Single
	<input value="Married" type="radio" name=maritalStatus
	<% if (customer.getMaritalStatus().equals("Married")) {%> checked="true" <%}%>
		/>Married
	<p>

	<input type=submit value="Generate Greeting">

  </form>  <p>

  Generated Greeting:

  <b><%= engine.generateGreeting(customer) %></b>

  <br><hr>

  </font>
  </body>
</html>
|
Here we are using two JSP bean 'customer' and 'engine'. All input fields will be saved in the object 'customer' that will be passed as a parameter for GreetingEngine's method: engine.generateGreeting(customer). The result (generated greeting) will be placed into a new html page produced upon "submit".
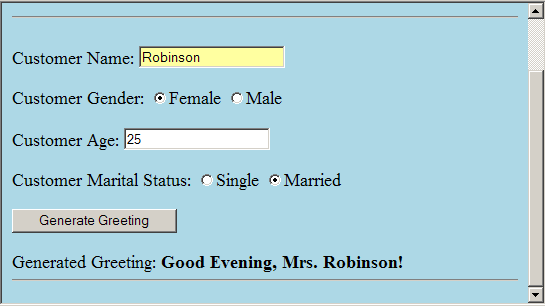
Step 8 – Test a new GUI
Now we can build and deploy the updated web application by executing target deploywar of the build.xml file. After running a browser with to http://localhost:8080/hello.tomcat/index.jsp (from file run.html) we should receive a new GUI:
Now you can change Customer's attribute, pusk "Generate Greeting", and receive different greetings in different time of the day.
Summary
We added to our application hello.tomcat a Java-based business object model.
We have implemented business logic in Java.
We added a JSP-based GUI.
Back Part 3 – Moving Business Logic to OpenRules
Copyright © 2005-2006, OpenRules, Inc.