Developing a Web
Application
with Spring Framework and OpenRules
Part 3 – Adding Business Logic in Java
This is the third part of a step-by-step account of how to develop web applications using Spring framework and OpenRules. The first part described how to setup a Tomcat-based development environment and create a trivial web application. The second part added major Spring modules and a view that displays current date and time. In this part we will add business object model and business logic that will allow us to greet a customer based on his/her personal data and time of the day. For example, at 2:20PM for a customer "Robinson" who is a married woman of 28, we want our application to generate a greeting like "Good Afternoon, Mrs. Robinson!". We will use Java classes and JSTL-based GUI to represent business and presentation logic. We want to implement this application in such a way that it can be easily extended to cover a much more complicated business logic with multiple business objects.
Step 16 – Defining Business Object Model
So far our application is not very
useful. Now we would like to add a little bit of business logic and related
business objects to generate customer specific greetings. Our application will deal with an
object Customer, for which we should be able to specify name, gender, marital
status, age, and probably other characteristics. In order to separate the web
dependent logic from the business logic we will create two separate
packages for the Java source – 'web' and 'hello'. Let's create a Java package
'hello' (a folder under src), in which we will put a new Java class Customer and all other classes
that will describe a business object model of our application. We also make our
classes Serializable, not necessary for
our application, but could come in handy later on if we have to pass
this class between different application layers. The
Customer class is implemented as a JavaBean:
| hello.spring/src/hello/Customer.java |
package hello;

import java.io.Serializable;

public class Customer implements Serializable
{
	protected String name;
	protected String maritalStatus;
	protected String gender;
	protected int age;

	public Customer() {
		name = "Robinson";
		maritalStatus = "Married";
		gender = "Female";
		age = 25;
	}

	public String getGender() {
		return gender;
	}
	public String getMaritalStatus() {
		return maritalStatus;
	}
	public String getName() {
		return name;
	}
	public void setGender(String string) {
		gender = string;
	}
	public void setMaritalStatus(String string) {
		maritalStatus = string;
	}
	public void setName(String string) {
		name = string;
	}

	public int getAge() {
		return age;
	}
	public void setAge(int age) {
		this.age = age;
	}
}
|
The Customer class allows us to create a customer and set/get its attributes when we need to do it. Now we will define an object GreetingEngine that should implement an interface to our web-based greeting service. The main function of this service is to generate a personalized greeting for any Customer based on time of the day and customer's attributes. Let's add the proper interface to our 'hello' package:
| hello.spring/src/hello/IGreetingEngine.java |
package hello;

public interface IGreetingEngine {

	public String generateGreeting(Customer customer);
}
|
We can have different implementations of this interface including Java, XML, or rules. These two classes present our simple business model.
Step 17 – Implementing Business Logic in Java
While we can have different implementations of
GreetingEngine interface, now we will proceed with a basic Java implementation.
Even using Java, it makes sense to encapsulate business logic of
greeting generation in a separate underlying "engine" that will be called by our GreetingEngine.
Later on (Part 4) we will move business logic from this JavaEngine to OpenRules. Let's postpone an implementation of JavaEngine for a while, and try to implement our GreetingEngine first. Here is a
possible implementation:
| hello.spring/src/hello/GreetingEngine.java |
package hello;

import java.io.Serializable;

public class GreetingEngine implements Serializable, IGreetingEngine {

	private JavaEngine engine;

	public GreetingEngine() {
		engine = new JavaEngine();
	}

	public String generateGreeting(Customer customer) {
		EngineResponse response = new EngineResponse();

		engine.run(customer, response);

		String result = response.get("greeting") + ", " +
				response.get("salutation") + " " +
				customer.getName() + "!";
		System.out.println("Generated Greeting: " + result);
		return result;
	}
	public static void main(String[] args) {
		GreetingEngine engine = new GreetingEngine();

		Customer customer = new Customer();
		customer.setName("Robinson");
		customer.setGender("Female");
		customer.setMaritalStatus("Married");

		engine.generateGreeting(customer);
	}
}
|
In this implementation, we create an instance of JavaEngine inside a constructor for GreetingEngine. We run this engine inside method 'generateGreeting' by passing to it two parameters:
customer - to analyze customer's attributes
response - an object of a new class EngineResponse, into which JavaEngine is supposed to place generated greeting (like "Good Morning") and salutation (like "Mrs.").
So, we will also need a simple Java object for EngineResponse that can be implemented as a simple HashMap:
| HelloSpring/src/bus/EngineResponse.java |
package hello;
import java.util.HashMap;

public class EngineResponse extends HashMap {
}
|
And finally, we are ready to concentrate on a
JavaEngine implementation. By now we already know that this Java class should
have a method 'run' with two parameters of types Customer and EngineResponse. We
also can create two separate methods to define Greeting and Salutation. Here is
a possible implementation:
| hello.spring/src/hello/JavaEngine.java |
package hello;

import java.util.Calendar;
import java.io.Serializable;

public class JavaEngine implements Serializable {

	public void run(Customer customer, EngineResponse response) {
		defineGreeting(customer,response);
		defineSalutation(customer,response);
	}

	public void defineGreeting(Customer customer, EngineResponse response) {
		int hour = Calendar.getInstance().get(Calendar.HOUR_OF_DAY);

		String greeting = "?";
		if (hour > 0 && hour <= 12)
			greeting = "Good Morning";
		else
		if (hour > 12 && hour <= 18)
			greeting = "Good Afternoon";
		else
		if (hour > 18 && hour <= 21)
			greeting = "Good Evening";
		else
		if (hour > 21 && hour <= 24)
			greeting = "Good Night";
		response.put("greeting",greeting);
	}

	public void defineSalutation(Customer customer, EngineResponse response) {
		String salutation;
		if (customer.getGender().equals("Male"))
		{
			if (customer.getAge() < 4)
				salutation = "Little";
			else
				salutation = "Mr.";
		}
		else
		{
			if (customer.getMaritalStatus().equals("Married"))
				salutation = "Mrs.";
			else
				salutation = "Ms.";
		}
		response.put("salutation",salutation);
	}
}
|
While this implementation is not end-user friendly and difficult to extend, it should serve our purposes. You may already test it by running GreetingEngine as a regular Java application. Later on we will replace this Java code with business rules.
Step 18 - Updating the Controller
First, let's create a Java package 'web' (a
folder under src) and move into it the file HelloController.java. Next, we will modify the
HelloController to
hold a reference to instances of new classes Customer and GreetingEngine.
| hello.spring/src/web/HelloController.java |
package web;
public class HelloController implements Controller {

    /** Logger for this class and subclasses */
    protected final Log logger = LogFactory.getLog(getClass());

    private Customer customer;
    private GreetingEngine greetingEngine;

    public ModelAndView handleRequest(HttpServletRequest request, HttpServletResponse response)
            throws ServletException, IOException {

        String now = (new java.util.Date()).toString();
        logger.info("returning hello view with " + now);

        Map myModel = new HashMap();
        myModel.put("now", now);
        myModel.put("customer", getCustomer());
        myModel.put("greetingEngine", getGreetingEngine());

        logger.info("running greetingEngine for customer " +getCustomer().getName());
        getGreetingEngine().generateGreeting(getCustomer());

        return new ModelAndView("hello", "model", myModel);
    }

    public Customer getCustomer() {
        return customer;
    }
    public void setCustomer(Customer customer) {
        this.customer = customer;
    }
    public GreetingEngine getGreetingEngine() {
        return greetingEngine;
    }
    public void setGreetingEngine(GreetingEngine engine) {
        this.greetingEngine = engine;
    }
}
|
Now the ModelAndView keeps references to the date and time,
customer, and a greeting engine. While handling the request, the controller will
execute method "generateGreeting" to produce the correct ModelAndView.
Step 19 – Modify the view to display business data and add support for message bundle
We will modify hello.jsp to display a customer
data
add a generated greeting for this customer. We will also replace
the title, heading and greeting text with a JSTL <fmt:message>
tag that pulls the text to display from a provided 'message' source
–
we will show this source in a later step.
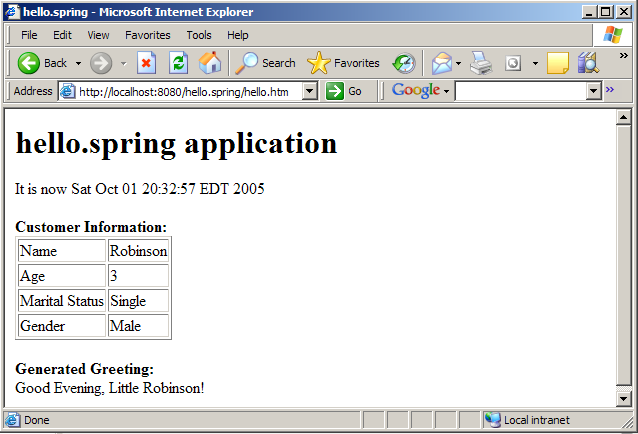
| hello.spring/war/WEB-INF/jsp/hello.jsp |
<%@ include file="/WEB-INF/jsp/include.jsp" %>
<html>
<head><title><fmt:message key="title"/></title></head>

<body>
  <h1> <fmt:message key="heading"/> </h1>


  <fmt:message key="greeting"/> <c:out value="${model.now}"/>

  <p>
  <b>Customer Information:</b> <br>
  <table border="1">
	<tr>
	  <td>Name</td>
	  <td><c:out value="${model.customer.name}" /></td>
	</tr>
	<tr>
	  <td>Age</td>
	  <td><c:out value="${model.customer.age}" /> </td>
	</tr>
	<tr>
	  <td>Marital Status</td>
	  <td><c:out value="${model.customer.maritalStatus}" /> </td>
	</tr>
	<tr>
	  <td>Gender</td>
	  <td><c:out value="${model.customer.gender}" /> </td>
	</tr>
  </table>

  <p>
   <b>Generated Greeting: </b><br>
   <c:out value="${model.greetingEngine.result}"/>
  </p>

</body>

</html>
|
Step 20 – Add some test data to automatically populate some business objects
We are not going to
add any code to load the business objects from a database (at least for now).
Instead, we can “wire up” a couple of Customer instances using
Spring's bean and application context support. We will simply put the
data we need as a couple of bean entries in hello.spring-servlet.xml. We
will also add the messageSource entry that will pull in the messages
resource bundle ('messages.properties') that we will create in the
next step.
| hello.spring/war/WEB-INF/hello.spring-servlet.xml |
<?xml version="1.0" encoding="UTF-8"?> |
Step 21 – Add the message bundle and a 'clean' target to build.xml
Create a 'messages.properties' file in the war/WEB-INF/src directory. This properties bundle so far has three entries matching the keys specified in the <fmt:message> tags that we added to the hello.jsp.
| hello.spring/war/WEB-INF/src/messages.properties |
title=hello.spring heading=hello.spring application greeting=It is now |
Since we moved some source files around, it makes sense to add a 'clean' and an 'undeploy' target to the build scripts. Add the following entries to the build.xml file.
    <target name="clean" description="Clean output directories">
        <delete>
            <fileset dir="${build.dir}">
                <include name="**/*.class"/>
            </fileset>
        </delete>
    </target>

    <target name="undeploy" description="Un-Deploy application">
        <delete>
            <fileset dir="${deploy.path}/${name}">
                <include name="**/*.*"/>
            </fileset>
        </delete>
    </target>
|
Now stop the Tomcat server, run the clean, undeploy and deploy targets. This should remove all old class files, re-build the application and deploy it. Start up Tomcat again and you should see the following:
Up Part 2 – Adding Major Spring Components Part 4 – Adding Unit Tests and a Form to the Application